Unveiling the Secret to Pillowy Fluffy Greek Pita Bread at Home
Imagine tearing into a warm, unbelievably Homemade Fluffy Greek Pita: Never Buy Store-Bought Again, its soft, pillowy texture yielding with every bite. The aroma of freshly baked bread filling your kitchen, a stark contrast to the often dry, stiff versions found in grocery stores. This isn't just a dream; it's an achievable reality with our easy guide to making truly exceptional fluffy Greek pita bread. Once you experience the unparalleled softness and fresh taste of homemade, you'll wonder why you ever settled for anything less.
Making fluffy Greek pita bread at home is not only incredibly satisfying but also surprisingly simple, requiring just a handful of pantry staples you likely already possess. This comprehensive guide will walk you through each step, ensuring you achieve that signature flexible, airy texture perfect for scooping up your favorite dips, crafting hearty wraps, or simply enjoying on its own. Get ready to elevate your culinary game and delight your senses with every golden, puffed-up piece of pita.
Why Homemade Fluffy Greek Pita Bread Reigns Supreme
The distinction between store-bought pita and a homemade rendition is night and day. Pre-packaged options often lack the tender crumb and elasticity that defines truly great pita. They can be thin, brittle, and prone to cracking, making them less ideal for robust fillings or hearty dips. Homemade fluffy Greek pita bread, on the other hand, offers a richness of flavor and a superior texture that transforms any meal.
Beyond the immediate sensory pleasure, there's a certain magic in baking bread from scratch. The process itself, from the gentle bubbling of activated yeast to the hypnotic rise of the dough and the puffing action in a hot skillet, is incredibly rewarding. You gain complete control over the quality of ingredients, ensuring no unwanted additives or preservatives. Plus, the aroma of fresh dough permeating your home is an experience in itself, promising a delightful culinary journey. These pitas aren't just an accompaniment; they're the star, providing a much better experience than any pre-packaged alternative and becoming a staple you'll never want to be without.
The Pillars of Pillowy Perfection: Key Ingredients & Their Roles
Achieving that coveted pillowy texture in your fluffy Greek pita bread hinges on understanding the role each ingredient plays. You'll need just seven basic items:
- Warm Water & Milk: The liquid base for your dough. Using a combination of warm water and whole milk (or a dairy-free alternative) is crucial. The warmth awakens the yeast, while the milk, packed with protein, calcium, and vitamins A & D, contributes to a richer flavor, a softer crumb, and a beautiful golden-brown crust. Ensure the temperature is very warm to the touch, but not so hot that you can't comfortably hold your finger in it for a few seconds.
- Sugar: A little sugar provides the initial food source for the yeast, helping it activate and thrive. It also aids in browning the pita during cooking.
- Active Dry Yeast: This is the engine of your pita, responsible for the lift and airy texture. Fresh yeast is paramount; if it's old or inactive, your dough won't rise, resulting in flat, dense pitas. Always check the expiration date and ensure it becomes frothy after activation.
- Olive Oil: A cornerstone of Greek cuisine, extra virgin olive oil not only imparts a distinctive, delicious flavor but also contributes to the dough's tenderness and elasticity. It's loaded with heart-healthy monounsaturated fats and powerful antioxidants, making it a wholesome addition. Don't be shy with it – as the saying goes, "pour with your heart because it’s good for your heart!"
- Salt: Essential for enhancing flavor and controlling yeast activity. Without salt, bread can taste bland, and the yeast might become overactive.
- All-Purpose Flour: The structural backbone. While many flours work, using a high-quality unbleached all-purpose flour, like King Arthur, is highly recommended. Its consistent protein content provides the perfect balance: enough strength to allow the pita to puff and hold its shape, yet tender enough for that delicate, pillowy crumb. Lower quality flours can sometimes lead to a gummy texture or a bread that tears too easily when folded.
Easy Guide: Step-by-Step to Your Best Fluffy Greek Pita Bread
Let's dive into the process. Patience and attention to detail at each stage will guarantee your success.
1. Activating the Yeast & Initial Mix
In a medium-sized bowl, combine your warm water and milk. The temperature is key here – think bathwater warm, not scalding. Whisk in the sugar, followed by the active dry yeast. Give it a gentle stir, then let it sit undisturbed for 5-10 minutes. This "proof" stage is critical: if your yeast is alive and active, the mixture will become visibly frothy and bubbly. If it doesn't, your yeast might be expired, and it's best to start again with a fresh batch.
Once frothy, whisk in the olive oil and salt. These liquid ingredients are now ready to meet the flour.
2. Forming & Kneading the Dough
Gradually stir in the all-purpose flour using a sturdy wooden spoon or a dough hook on a stand mixer. Mix until a shaggy, somewhat sticky dough forms and all the flour is incorporated. At this stage, it won't look smooth or elastic, but don't worry – that comes next.
Transfer the shaggy dough to a lightly floured work surface. Knead the dough for a full 10 minutes. This might seem like a long time, but it's crucial for developing the gluten, which gives the pita its elasticity and structure, allowing it to puff beautifully. Your dough will transform from sticky and rough to smooth, pliable, and elastic. If the dough feels too sticky, lightly dust your hands or the surface with a little more flour, or even slightly wet your hands with water as recommended in our Best Fluffy Greek Pita Recipe for Dipping, Scooping & Wraps.
3. The Double Rise for Maximum Fluff
Place the kneaded dough back into the mixing bowl. Drizzle a little olive oil over the top and turn the dough to coat, preventing it from drying out. Cover the bowl tightly with plastic wrap or a damp tea towel. Now, find a warm spot in your kitchen – perhaps near a sunny window, above a warm oven, or in a slightly warmed (but turned off) oven. Let the dough rise until it has doubled in size, which typically takes about 1 to 1.5 hours, depending on the ambient temperature.
After the first rise, gently punch down the dough to release the air. Transfer it back to a lightly floured surface and gently form it into a large circle. Divide this circle into 6 equal pieces. This can be done by eye or by weighing the dough and dividing the total by 6 for precision. Roll each of these 6 pieces into smooth, uniform balls. Place them on a parchment-lined baking sheet, ensuring they have a little space between them. Cover them again with a clean tea towel and let them rest for a second rise, for about 1 more hour. This second rise allows the individual pitas to develop even more air and ensures a truly fluffy final product.
4. Rolling & Cooking to Golden Perfection
Once the second rise is complete, gently take each dough ball and, on a lightly floured surface, roll it out into a 5-inch wide circle. Aim for an even thickness across the entire circle for uniform cooking and puffing.
Now, for the magic! Heat a cast iron skillet or a heavy-bottomed non-stick skillet over high heat. This initial high heat is key to getting the pan screaming hot, which helps the pita puff. This may take 3-4 minutes. Once hot, reduce the heat to medium. Place one rolled-out dough round in the hot pan. Cook for 30 seconds, then flip it. Cook for another 30 seconds on the second side. You should start to see some bubbles forming.
Here's where the olive oil comes in again during cooking: drizzle about 1 tablespoon of olive oil directly onto the pita in the pan, ensuring both sides get a little love. Now, continue to cook for 5 more minutes, flipping the pita every minute. During this time, the pita should magically puff up like a balloon, turning a beautiful deep golden brown. The internal steam created by the hot pan and sealed within the dough is what causes this incredible puff. Repeat this process until all 6 pitas are cooked.
Serving Your Fluffy Greek Pita Bread
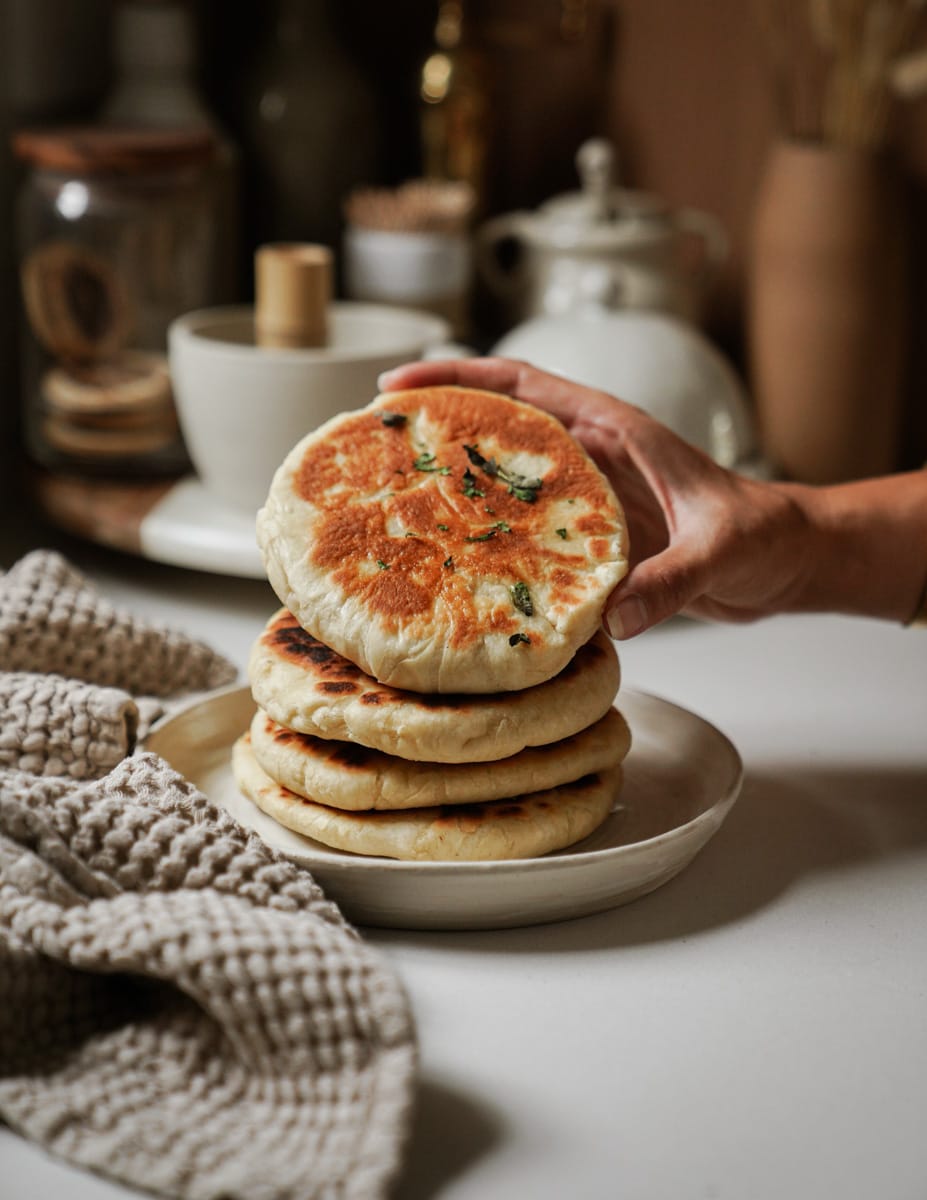
Once cooked, transfer your warm, pillowy fluffy Greek pita bread to a plate. For an extra touch of flavor, you can brush them with a little more olive oil and sprinkle with fresh oregano, just like they do in Greece. These pitas are incredibly versatile. They are the ultimate accompaniment to classic Greek dips like creamy tzatziki, vibrant hummus, or smoky baba ghanoush. They make fantastic wraps for gyros, souvlaki, or even simple grilled vegetables. Or, simply enjoy them plain, savoring the fresh, warm taste. You'll never want to buy pita again!
Conclusion
Making your own fluffy Greek pita bread is a culinary journey that rewards you with an incredibly soft, flavorful, and versatile bread that far surpasses any store-bought alternative. From the simple joy of watching the yeast activate to the satisfaction of seeing your pitas puff up perfectly in the skillet, every step is a delight. With this comprehensive guide and a little practice, you'll master the art of creating these pillowy wonders, transforming your meals and impressing everyone at your table. So, roll up your sleeves, gather your ingredients, and prepare to embark on a delicious adventure into the world of homemade Greek pita.
